How to Set Up a Discord Event to Move Viewers to Your Stream
What the "Go Live" Event Does in Discord
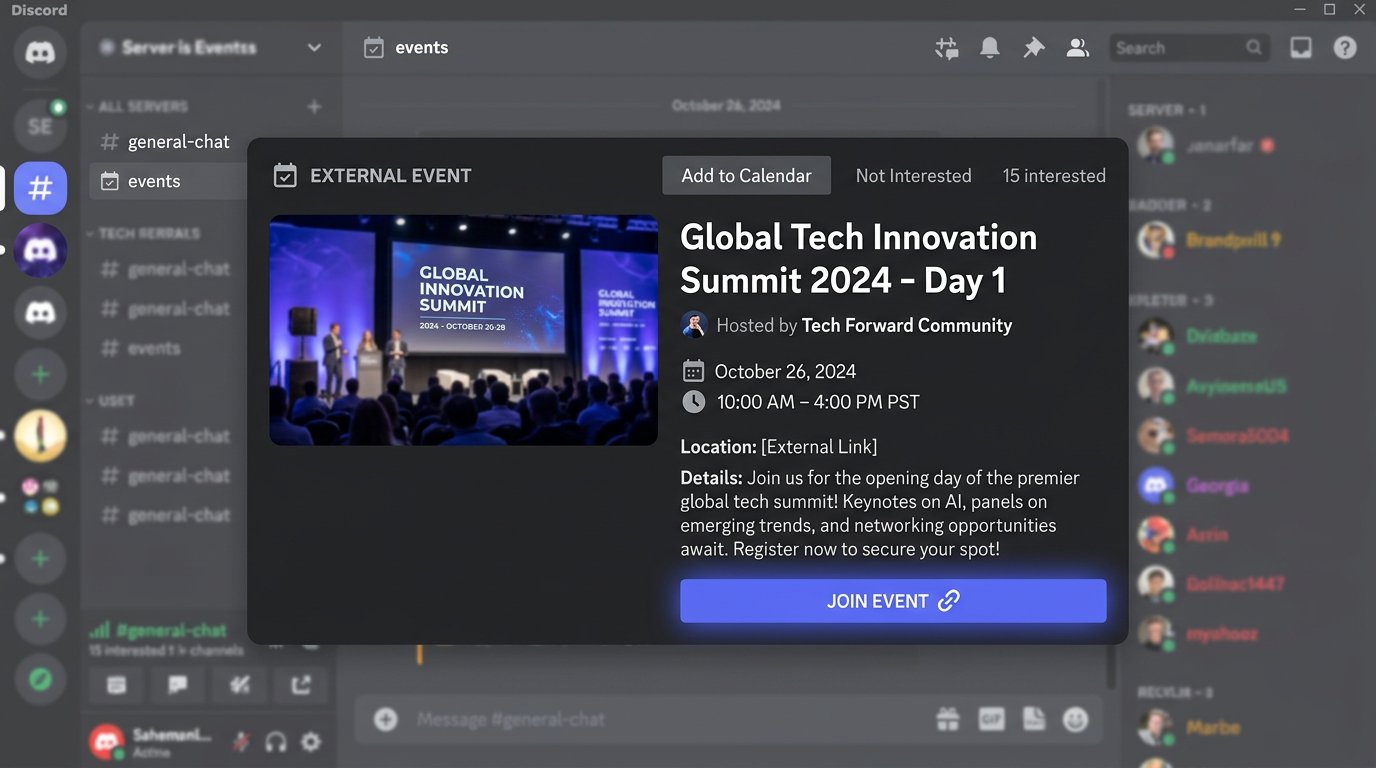
A Discord external event gathers the broadcast announcement into a single card: viewers see the title, time, cover image, description, and location. For a stream, the location becomes a link to the channel, a specific broadcast page, or a multi-link with all platforms.
Discord cannot force a member to switch to your stream. The event gives viewers a clear entry point and can send a notification when it starts, but the user has to open the stream themselves. That's why the main goal of setup is to make the link visible, working, and consistent across all announcements.
Choose the Link for the Event Card
For regular broadcasts, a permanent channel link usually works best: you don't have to change it before every stream. If the streaming platform creates a page for the scheduled broadcast in advance, you can use a link to that. This option is handy when viewers need to see the topic and time of a specific stream before it starts.
A permanent link has a downside: a viewer who arrives early will see an offline page or a past recording. A link to a specific broadcast is more precise, but you need to check it after rescheduling, changing the category, or recreating the stream.
Where to Create a Discord External Event
Open the Discord server you need and click its name in the top-left corner. In the menu, select the events section, then create a new event. In some client versions, the event list also opens from the top of the channel list.
In the first step, Discord will ask you to choose a location. For a stream outside Discord, select "Somewhere Else" or the external event format. Don't choose a server voice channel: that kind of card will send members into Discord, not to the streaming platform.
Which Fields to Fill In When Creating the Event
In the location field, paste the full URL of the stream or channel, including the link protocol. This is the key field of an external event: it's how viewers should reach the broadcast. Then enter the title, date, and start time. Without this data, Discord won't create a proper event card.
- Title: the stream topic or a clear format, not just "Stream."
- Location: a link to the channel, broadcast, or a page with links.
- Date and time: the actual start time in the selected time zone.
- Description: a brief topic, language, format, and any important conditions for viewers.
- Cover image: an image without small text that reads well in the card on a phone.
The description and cover image may be optional in the interface, but without them the event looks incomplete and stands out less in the list. The downside of a detailed description is that it's hard to read on a mobile screen, so it's better to keep it to a few short lines.
How to Design the Event Card for Viewers
In the title, state what the stream is about: a game, a breakdown, chatting, an update test, or a co-op format. If the schedule repeats, add an episode number or the topic of the day. Viewers should understand why they should go to the stream before they even open the link.
In the description, repeat the URL as text, even if it's already in the location field. This helps when a member opens the notification in compact view or copies the link to another device. Don't bury the address after a long intro and a list of rules.
How to Launch the Event When the Stream Starts
A created event doesn't become active on its own just because the specified time arrives. Before the stream, open the event card in Discord and select the launch action. Do this after the stream is already available at the link: otherwise the first viewers will land on an offline screen.
Manual launch is the most reliable option for one or a few streams per week. It doesn't require a bot, tokens, or external services. The downside is obvious: you can forget to do it, especially if stream prep is rushed.
Add Separate Notifications for Interested Members
The event card stays on the server, but not all members will see it in time. For a timely announcement, create a stream notifications role and let users get it themselves via a roles channel, a bot, or a reaction, if that's the method used on the server.
After launching the event, post a short message in the announcements channel: a role mention, the topic, and the link. You don't need to repeat the whole card description there. The message's job is to announce the start, while the event card's job is to give the schedule and context in advance.
- Post announcements in one permanent channel.
- Only mention the role of those who subscribed to streams.
- Put the link in the first or second line of the message.
- Keep the channel readable for regular members.
The downside of role-based notifications is that some of the audience won't assign themselves the role or will turn off mentions. So don't replace the event itself or the pinned schedule on the server with them.
When You Need Automation via EventSub
Automation is useful if you need not only a pre-created card but also a message in Discord after you actually go live. On Twitch, this is done with EventSub and a subscription to the stream.online event. The platform sends a notification when the channel starts broadcasting.
It's important to separate the two tasks. EventSub can trigger a message in the announcements channel, while your own bot with Discord API access can switch the scheduled event to active status. A regular Discord incoming webhook can post messages but doesn't manage event cards.
How to Subscribe to Twitch EventSub
To subscribe, you'll need an app in the Twitch developer console, its client ID, and an access token with the required scopes. In the subscription request, specify the stream.online event type, the channel ID, and the webhook delivery method. The callback address must be reachable from the internet over HTTPS.
After the subscription is created, Twitch will send a verification request to the callback. The handler must return the challenge value from that request in the expected format. Until verification passes, the subscription won't become active and no stream start notifications will arrive.
Verifying the Signature and Handling Duplicate Events
Every incoming EventSub notification must be verified using the signature headers, the send time, and the message ID. The signature is calculated from the raw request body, so verify it before parsing the JSON. This protects the handler from forged requests.
Store the IDs of already-processed notifications for a short period. If the same event is delivered again, the bot or script must not post a second announcement. The downside of custom handling is that it needs maintenance: keeping track of tokens, renewing subscriptions when needed, and checking for API changes.
How to Make Sure EventSub Actually Works
After creating the subscription, check its status via the developer console or the Twitch API. The subscription should be verified and active, and the callback should be reachable without browser authorization. An error in the HTTPS certificate, the handler address, or the challenge response is usually visible at this stage.
Then do a test run on a private stream or in a non-public Discord channel. Check the handler log: it should contain the verification request and the start notification. In Discord, make sure the message arrived once, contains the correct link, and mentions the right role.
The Make Scenario and Its Limitations
Make can be used as an intermediate scenario: receive the event, compose the announcement text, and send it to Discord via a webhook or the Discord module. Before setting it up, check whether the chosen setup can properly return the Twitch verification challenge and verify the request signature. If it can't, you'll need a separate handler between Twitch and Make.
The free Make plan has an operations limit. Every check, incoming request, data lookup, or message send may consume operations, so frequent tests and multiple channels will use up the limit faster. The downside of the builder is that the scenario depends on the plan, the platform's availability, and its webhook processing limits.
How to Automate Launching the Discord Card Itself
To automatically change an external event's status to "Live," you need your own bot or a server-side integration with the Discord API. After a confirmed stream.online event, the handler finds the scheduled event and switches it to active status. After the stream ends, it also needs to be completed with a separate action or by handling the end event.
The downside of this option is that it's more complex than a simple webhook announcement. It requires a bot, a token, event management permissions, secret storage, and error handling. If the only goal is for viewers to get the link after the start, a manual event and an automatic message are usually easier to maintain.
Discord Permissions and Protecting Webhook URLs
Give the bot only the permissions it needs to work: access to the announcements channel, sending messages, and managing events if it changes their status. Don't grant administrator permissions just to set up notifications. The broader the access, the greater the consequences of a code error or a token leak.
Keep the Discord incoming webhook URL secret. Anyone who gets this address can send messages to the channel on behalf of the webhook. If the address ends up in a public repository, screenshot, or chat, delete the webhook and create a new one.
Checklist Before Your First Public Stream
- The external event is created in the "Somewhere Else" format, not for a voice channel.
- The location field contains a working link to the correct channel or broadcast.
- The event date and time match the schedule and time zone.
- The card contains a short description and a readable cover image.
- The event launches manually and displays for a member without moderator permissions.
- The notification role can be enabled and disabled without contacting the admins.
- EventSub has passed callback verification and has active status.
- The EventSub signature is verified before processing the request content.
- A repeated event delivery doesn't create a duplicate announcement.
- A short manual message is prepared in case automation fails.
Last Articles
What has changed in design and functionality We have updated the website to make working with it faster and more convenient. The main changes affect ..
Good afternoon, I've collected all the news during this time.: 1. The main news is that prices for twitch viewers have been greatly reduced, while Tw..
1. Use promo code "December2025" for a 15% discount for all our viewers2. We have reduced the base prices for our configurator and the most affordable..
Twitch services are working stably, so we are ready to cooperate with squads, resellers, service owners, bot owners, and many others.Individual te..
We have completely updated our Twitch viewer services, and they are now working stably. We only use high-quality IP addresses for the viewers.The ..
Hello everyone! Today, we are announcing a new feature—"Twitch Viewer Configurator". Now, you can customize any plan for your Twitch channel. Choo..
Greetings, I have compiled a guide for streamers, which will be very relevant at the moment. Now YouTube and twitch have disabled monetization from vi..
We have finally developed the APINow it will be more convenient for our partner sites to work with us.To update the maximum tariffs for YouTube, an up..
Due to the huge popularity of the partnership services and referral program, we have made a cooperation table. The essence is very simple: more live a..
Our Services for Streamers





Our Services for Content Creators