Setting up a Minecraft modpack for a stream: fast viewer entry
First, define the minimum client for entry
A viewer doesn't need a copy of your streaming client. The working folder usually contains shaders, recording mods, HUD, keybinds, camera settings, a minimap, screenshots, and old configs. If you hand over this folder as is, installation becomes heavier and finding conflicts becomes harder.
Include in the base pack only what the client needs to connect to the server or to see its modded content. Everything that only changes visuals, controls, or convenience should go into a separate recommended set.
The minimum pack doesn't have to look like the broadcast. A viewer may have different render distance, fog, interface, and lighting quality. This limitation needs to be taken into account in quests and builds: important objects shouldn't be noticeable only with your shader or HUD.
Check the installation side of each mod
Before assembling, open the pages of all mods and divide them into server-side, client-side, and common. Server mods manage permissions, land protection, logs, economy, or world rules. Client mods change the interface, performance, and rendering. Common mods add items, blocks, entities, menus, or mechanics that must match between the server and the player.
For example, mods with new machines, character origins, or dimensions are most often needed on both sides. ReplayMod, a minimap, and shader add-ons usually aren't needed for connecting. But you can't rely only on the client or server label: the specific mod version and the loader combination can change requirements.
Verify the result by joining from a clean instance. This is the fastest way to find a mod that is formally labeled as client-side but conflicts with required content, or a library that the server doesn't require but without which one of the client mods won't start.
Replace client-side mechanics with server settings
Don't force a viewer to install a mod if the task can be solved by the server side. Region protection, group permissions, action logs, warps, chat rules, and part of the quest logic can work without additional files on the client. The fewer mods involved in connecting, the easier it is to update the pack before a broadcast.
Recipes, item tags, loot tables, advancements, functions, and simple events can be moved into a datapack. It's loaded by the server along with the world. Block and item appearance is conveniently handled by a resource pack that the server offers to download on join.
A datapack won't add a new block, mob, dimension, or separate interface screen. A viewer may decline the resource pack or disable it later. If a mechanic relies on new entities or complex generation, the required mod will still remain in the pack.
Lock in the game version and a single loader
The pack description must state the Minecraft version, the loader, and the pack version itself. Fabric, Forge, and NeoForge are not interchangeable options: a mod with a similar name may exist for several loaders, but its file and dependencies will be different.
Choose the loader based on the required mods, not out of habit. If the needed content set works on several options, build a test profile for each and compare the actual number of required dependencies, launch stability, and ease of updating. One extra library mod by itself isn't a problem, but a random set of incompatible libraries will become one.
Strict version locking means a viewer won't be able to join with their usual profile on a different game version. But you won't have to figure out during a stream why one person is using a different loader or a newer mod file.
Create a separate viewer pack profile
Don't clean out the folder you stream from. Create a separate instance in Prism Launcher and install Minecraft, the loader, the required mods, the needed dependencies, and only those configs that affect compatibility into it. The profile must launch without access to the files of your main installation.
In Prism Launcher, it's convenient to check the mod list via the Mods tab: it shows file names, versions, and enabled libraries. This helps you notice that a local recording mod got into the profile or that a dependency on a removed add-on is still there.
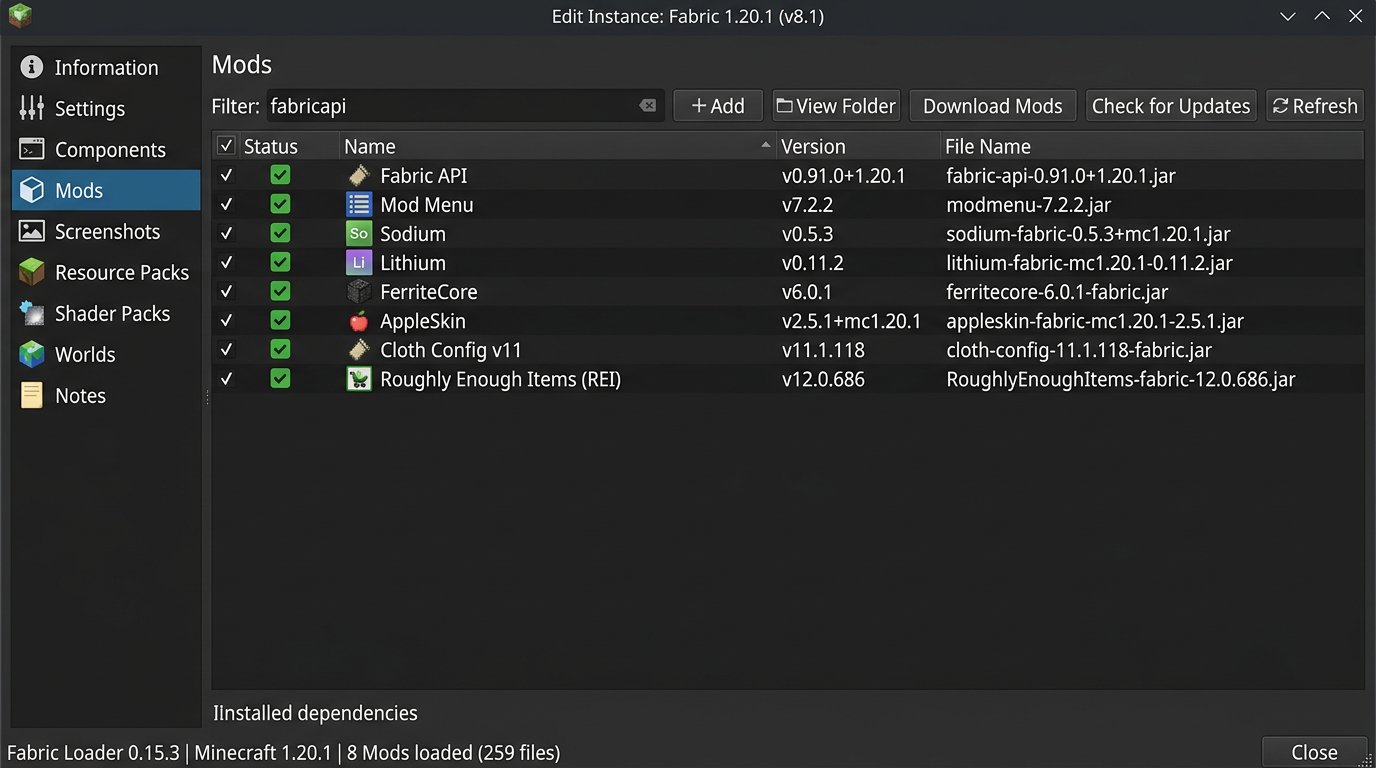
The separate instance will have to be maintained after every server change. If you forget to update it at the same time as the server, the published pack quickly becomes outdated. But it's exactly this profile that shows the viewer's real path, not the state of your configured working folder.
Assemble dependencies without extra files
Libraries like Fabric API, Architectury API, Cloth Config, or Moonlight are often necessary, but you shouldn't include them "just in case." For each required mod, check the dependency list on the project page and match it against the contents of the viewer profile.
Remove libraries in small groups. After each change, launch the client, create a test world, and connect to the server. Pay especially close attention to libraries after removing client mods: they often leave behind several files that no one uses anymore.
Automatic dependency downloading in the launcher doesn't cancel verification. Different mod versions may have different requirements, and forcing a library to a newer version can break client startup even with the same file name.
Move graphics and convenience into an optional set
Shaders, Iris, Sodium, Embeddium, Distant Horizons, minimaps, animations, sound add-ons, replay mods, and extended HUD shouldn't be a condition for entry if server mechanics don't depend on them. This is especially important for viewers with different hardware and their own control settings.
Publish next to the main pack a list of recommended add-ons for visuals and performance. Separately state which mods are compatible with your loader and game version, and which are used only on the broadcast. Don't add to this list mods that you haven't tested together with the base profile.
Participants will see the world differently: distant objects, shadows, particles, and fog may differ. Don't tie hints, hidden passages, and important game signals to effects that aren't in the minimum client.
Keep only shared configs
Mods may create configs on first launch. Some files are needed by the server, others are responsible for the personal interface, and still others set parameters that must match for all players. If an important shared config doesn't make it into the pack, the client sometimes launches fine, but the server rejects the connection or the mechanic behaves differently.
Don't copy the entire config folder to viewers. It often contains keybinds, graphics settings, widget positions, recording paths, shader settings, and other personal profile data. Leave only the files without which the server logic or the display of required content can't be reproduced.
After a mod update, a config may get new fields or change format. That's why updating the mod and publishing a new pack should be a single task: you can't assume an old set of configs automatically fits a new version.
Export the pack in .mrpack format
Use .mrpack for the main distribution — the Modrinth modpack format. Inside such a file is a description of the Minecraft version, the loader, the file list, and links to projects, as well as files added by the author: configs, resource packs, and other permitted components. The launcher creates a separate profile and downloads the needed mods itself.
In Prism Launcher, open the finished instance, choose export, select the Modrinth pack option, and check the contents before saving. The export should include the required configs and resource packs, but not logs, cache, screenshots, worlds, or personal settings. After creating the file, import it into a new empty instance rather than launching the source profile.
The .mrpack format is convenient because it doesn't force the viewer to manually search for dozens of files. Its limitation is that the official Minecraft launcher doesn't import such a pack on its own. Next to the link, you need to state plainly which compatible launcher to use and leave a fallback option for manual installation.
Look at existing packs as a structural reference
As an example of a client set, you can study Fabulously Optimized: it's a ready-made pack focused on optimization and visual settings, not on the content of a specific server. It shows why performance and graphics mods are better kept separate from the required server pack.
If the server runs on Fabric, you can publish two independent profiles: a minimum pack with the server mods and an optional client profile following the Fabulously Optimized principle. Don't merge them into one required archive just for the sake of identical visuals on the stream.
You can't declare someone else's ready-made pack compatible with your server without checking. It may contain conflicting optimization mods, a different loader version, or settings that change interface behavior. Use such projects as a structural reference, not as a replacement for your own test pack.
Prepare manual installation as a fallback
Some viewers won't want to import an .mrpack or use a compatible launcher. For them, you can upload a separate archive with mods and config folders, if this method suits your pack. The archive must not contain server files, logs, saves, or the contents of the personal .minecraft folder.
Next to it, write a short sequence of steps: install the exact Minecraft version, install the needed loader, create a separate profile, copy the folders from the archive into it, and launch the game once before connecting. If the server uses a resource pack, explain that it needs to be accepted on join or placed in the resourcepacks folder when that's actually required.
Manual installation more often breaks because of old mods in the folder, the wrong loader, and copying files into the wrong profile. This method should remain a fallback: supporting several manual configurations takes more time than importing one verified .mrpack.
Give the viewer short instructions next to the link
Keep the link to the current pack in the stream description, a pinned message, or on a separate page. Don't hide it among rules, addresses, and a long list of commands. In the first block, it's enough to state the pack version, Minecraft version, loader, and installation method.
- Download the .mrpack file from the main link.
- Open it through Prism Launcher or another launcher with Modrinth pack import.
- Wait for the new profile to be created and the mods to launch.
- Launch the profile once before joining the server.
- Accept the server resource pack if one is used.
- Add the server address and connect.
Short instructions won't replace help with rare conflicts, but they shouldn't turn into a big reference guide. For errors, it's better to set aside a separate block: what to send to support and which data to check before reaching out.
Test the publication from scratch
The best test is importing the published .mrpack into a clean instance without old mods, cache, and configs. Follow your own instructions: don't add files from the working profile and don't fix an error manually without recording it in the pack. If an additional file is needed for entry, the pack isn't ready yet.
After connecting, check more than just spawn. Open important menus, load chunks with modded blocks, obtain items, check crafting, entities, dimensions, quests, and trading — everything a viewer might encounter on the broadcast. Then restart the game and connect again.
A full check takes time, especially after updating content mods. But without it, errors usually show up right in the stream chat, when viewers have downloaded different file versions and are waiting for manual setup.
Version the pack and don't update it at the last moment
Use a clear number or version name for each published pack. When changing a required mod, library, config, or resource pack, create a new .mrpack, test it, and only then change the main link. Keep a short changelog next to it.
If the new version is incompatible with the old one, say so plainly: the viewer needs to import a new profile rather than try to update a single jar file in the old one. Remove old links from pins and descriptions, otherwise part of the audience will inevitably download an outdated archive.
Keeping several versions is useful for rolling back the server after a failed update. The downside is that the risk of mixing up files increases. Separate archives by version and publish only one link as the current one.
Collect data for troubleshooting
In the support instructions, ask for the exact error text, a screenshot of the launch window, the pack version, the Minecraft version, and the latest.log file if the client managed to create it. A message like "it doesn't work" doesn't let you tell a pack problem apart from third-party mods in the player's folder.
First check the typical causes: the wrong loader is selected, an old pack was imported, a dependency didn't finish downloading, the profile has custom mods added, or the resource pack wasn't accepted. If the same error appears for several viewers with a clean installation, temporarily stop distribution and check the published file.
Don't try to support every third-party client modification. Entry to the server requires a verified minimum profile; any additional mods are installed by the viewer at their own risk, and they should be able to quickly disable them without reinstalling the main pack.
Last Articles
What has changed in design and functionality We have updated the website to make working with it faster and more convenient. The main changes affect ..
Good afternoon, I've collected all the news during this time.: 1. The main news is that prices for twitch viewers have been greatly reduced, while Tw..
1. Use promo code "December2025" for a 15% discount for all our viewers2. We have reduced the base prices for our configurator and the most affordable..
Twitch services are working stably, so we are ready to cooperate with squads, resellers, service owners, bot owners, and many others.Individual te..
We have completely updated our Twitch viewer services, and they are now working stably. We only use high-quality IP addresses for the viewers.The ..
Hello everyone! Today, we are announcing a new feature—"Twitch Viewer Configurator". Now, you can customize any plan for your Twitch channel. Choo..
Greetings, I have compiled a guide for streamers, which will be very relevant at the moment. Now YouTube and twitch have disabled monetization from vi..
We have finally developed the APINow it will be more convenient for our partner sites to work with us.To update the maximum tariffs for YouTube, an up..
Due to the huge popularity of the partnership services and referral program, we have made a cooperation table. The essence is very simple: more live a..
Our Services for Streamers







Our Services for Content Creators