Setting Up Guest Star on Twitch: Guests, Browser Source, and Audio in OBS
What Guest Star Is and Which Streams It Suits
Guest Star is a built-in Twitch tool for collaborative broadcasts. The host creates a room, sends invitations, admits participants from the waiting area, and puts the finished layout with cameras and voices on air. A guest doesn't need OBS or any other streaming software: all they have to do is open a link in a browser, pick a camera and microphone.
The format suits interviews, talk streams, podcasts, reactions, breakdowns, and co-op playthroughs. The host manages the room lineup and layout in the Twitch panel, while OBS receives a single video output. The downside of the format is noticeable latency between participants. Guest Star is a poor fit for competitive matches, music rehearsals, and other tasks that require precise synchronization of actions.
Where to Find Guest Star in the Twitch Panel
Open the Creator Dashboard for the channel you need and go to Stream Manager. In the workspace, find the Guest Star panel. It's where you create a session, copy invitations, admit guests, change layouts, and remove participants.
If the panel isn't on screen, open the Stream Manager settings and add Guest Star from the available widgets. Place the panel next to chat and the preview. During a conversation, you need to keep an eye on join requests, camera status, audio levels, and the active layout.
Don't manage a single room from multiple tabs at once. Participant status or the selected layout may update with a delay. You can keep a spare tab open just for monitoring, but before taking any action, make sure it shows the current state of the session.
How to Create a Session and Send an Invitation to a Guest
In the Guest Star panel, start a new session. Twitch will create a waiting room and a link for the participant to connect. Copy the invitation and send it via direct messages, a private team chat, or another non-public channel.
Don't post the link in the stream chat, channel description, a post, or on screen. Anyone who gets the address can send a join request. If the invitation ends up publicly available, end the current session and create a new one. Removing an unwanted request doesn't make the old link private.
The guest link and the OBS output link are different addresses. The invitation opens the room for the participant, while the output link delivers the finished camera layout to OBS. If you paste the guest link into a browser source, your co-host won't make it on air.
What the Guest Should Do Before Connecting
The guest opens the invitation in a browser, grants Twitch access to the camera and microphone, then selects the right devices on the pre-check screen. Until the host admits them, the participant stays in the waiting area: their camera and voice don't reach the combined output.
Ask the guest to use headphones and mute the page with your stream. The Twitch player runs with a delay, so sound from the speakers comes back into the microphone and creates an echo. OBS filters can make the echo less noticeable, but they won't reliably eliminate it.
Agree on a backup line of communication in a messenger or private chat in advance. If the guest loses audio in the room, you won't be able to explain the next steps by voice. An external channel lets you ask the participant to rejoin, switch devices, or close a program that has taken over the camera.
How to Admit a Participant and Choose a Layout
After a join request, the participant appears in the Guest Star panel. Before adding them to the active room, check the name, the camera image, and the voice level. Then admit the guest and choose the layout that fits the current stream format.
The layout is changed in Guest Star, not in OBS. OBS receives a single video output with all active participants. For an interview, a two-window layout works well; for a roundtable, a grid; for a reaction or playthrough, a composition that emphasizes the host.
The finished layout can't be broken into independent sources. You can't move a specific guest separately or add a mask, frame, or animation to just them in OBS. The lineup and positioning of participants are changed through the Guest Star panel, while OBS styles the combined output as a whole.
Where to Get the Output Link for OBS
In the Guest Star panel, find the action related to outputting the layout to your streaming software. It may be labeled Browser Source or Browser Output. Copy the URL: this address opens the finished layout with active participants in OBS.
Don't send the output URL to guests and don't show it on screen. It's a working link for the OBS scene, not the address for joining the room. You can paste it into a pre-created browser source, but always verify the address against the current session before going live.
After you end the room and create a new session, the output link may change. The old Browser Source stays in the OBS scene but may show a blank screen or data from the previous room. In that case, don't rebuild the styling from scratch: replace the URL in the existing source's properties and check the result in the preview.
How to Add Guest Star to OBS via Browser Source
- In OBS, open the scene for the collaborative stream.
- In the sources block, click the add button and select "Browser."
- Create a new source with a clear name, such as Guest Star. Don't use window capture of the Creator Dashboard: service buttons, notifications, the participant list, and personal data could end up on air.
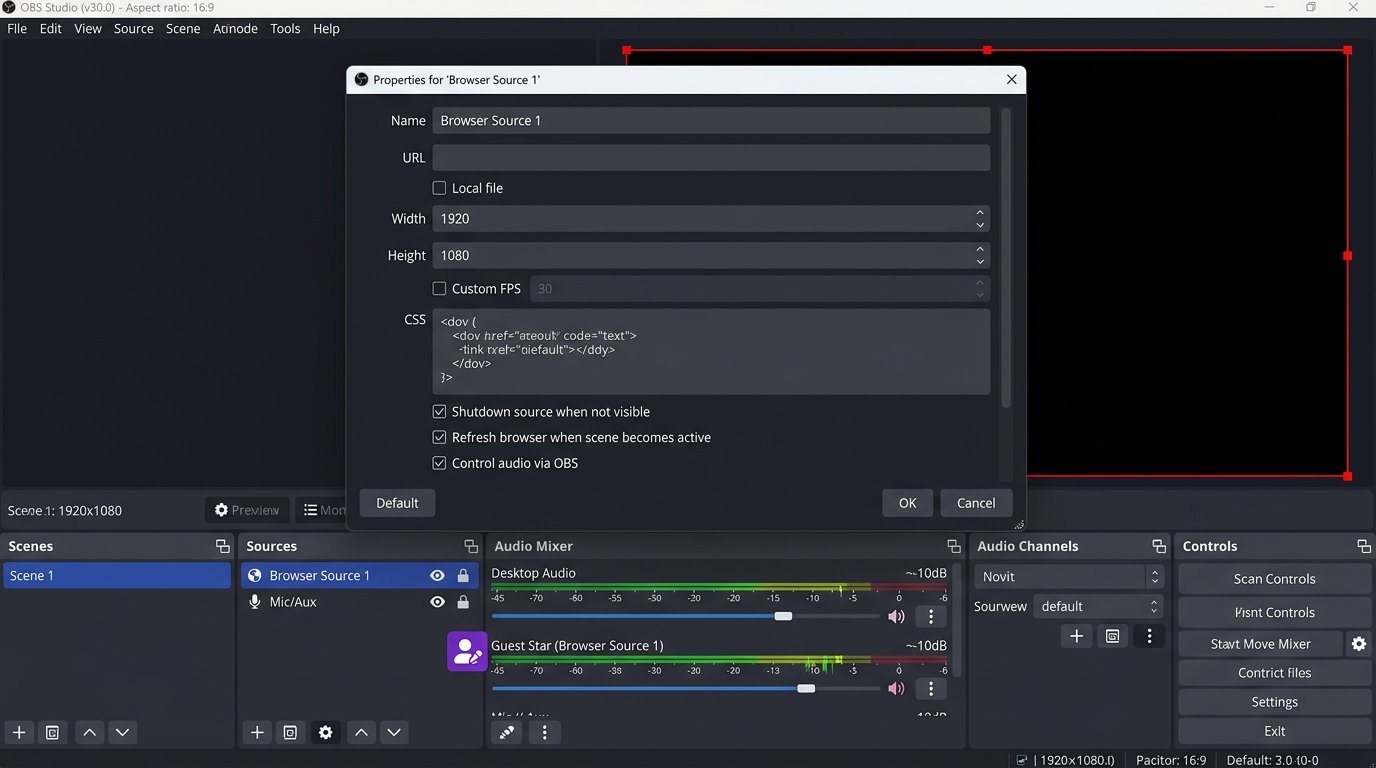
- In the properties window, paste the output link from the Guest Star panel into the URL field.
- Set the width and height to match the OBS canvas size. For a 1920×1080 canvas, set 1920 for width and 1080 for height. For other resolutions, use the actual canvas size.
- Save the settings and wait for the layout to load in the OBS preview.
Once added, the source appears on the scene. Stretch it to the canvas edges using transform or the bounding box handles. Place Guest Star above the background but below frames, labels, chat, and other styling elements. If the layout should occupy only part of the scene, first set it to the canvas's native resolution, then scale it down in the preview.
How to Enable Guest Star Audio in OBS
The voices of active guests are usually delivered along with the video output through the Browser Source. In the browser source properties, enable OBS audio control if that option is available in your version of the software. After that, the Guest Star channel should appear as a separate line in the audio mixer.
Ask the guest to say a few phrases and make sure the source's level meter is moving. Check that the audio isn't muted in the mixer, that the source is assigned to the right track, and that it isn't disabled in the advanced audio properties. The host's headphone monitoring and the audio the viewer receives can differ, so make a short local recording.
Don't add the same conversation through a second route. Desktop capture, browser window capture, or a separate audio device output alongside the Browser Source will cause doubled voice or echo. Separate routing is only justified with precise control of all audio channels.
Which Browser Source Settings to Check
In the source properties, check the width, height, and frame rate. If OBS offers a mode that matches the output frame rate, use it. A mismatch doesn't always cause an error, but camera motion may look less smooth.
The option to shut down the source when it isn't visible is usually best left off for Guest Star. When you switch to another scene, the browser source page may close, and when you return, the video and audio will need to load again. The downside of keeping the source running is that it keeps using computer resources even when off screen.
Refreshing the browser when the scene is activated can help get the current room state after a long absence from that scene. But with every switch, the source may briefly reload. Test this behavior on a test recording: for a live stream, it may be more inconvenient than a manual refresh.
How to Update the Guest Star Link After a New Session
After recreating the session, open the properties of the Browser Source you already added in OBS and replace the old URL with the current output link. Save the changes, wait for it to load, and check the image before going live. It's best to keep the old source: that way you won't have to reconfigure the size, position, filters, and layer order.
If the current link is pasted but the source shows the previous room, reload the browser source using the available OBS command or temporarily hide and show it after refreshing. Refreshing the Creator Dashboard page won't change the address that's already open inside OBS.
If the source stays blank, create a new Browser Source and paste the fresh URL. This works, but it has a downside: you'll have to set the size, position, audio, and styling elements again. Only delete the old source after checking the new one in the preview.
How to Check Output Latency and Desync
A slight Guest Star delay is normal for a browser connection and video delivery through Twitch. The guest may hear the host and see reactions at a different moment than when the viewer watches the stream. Don't try to sync the conversation using the stream player: you should go by the audio in the Guest Star room.
If the voice in OBS lags behind lip movement or arrives before the image, make a short local recording. That way you can figure out which signal is lagging in the final video. Don't add delay in the advanced audio properties at random: it may fix one segment and make the next one worse.
Manual compensation only works for a stable, constant problem. After a guest reconnects, a browser change, or a network quality change, the delay may be different. If the desync changes during the stream, it's safer to switch to the backup scene and ask the participant to rejoin the room.
How to Set Guest Volume and Avoid Echo
First, ask each participant to check their audio on their end: select the right microphone, raise an input level that's too low, and put on headphones. Boosting a quiet voice with an OBS filter doesn't always help: the fan, keyboard, and room noise will be amplified along with the speech.
Multiple Guest Star participants often arrive in OBS as a single audio channel. That's why you can't use an OBS fader to make one guest quieter and another louder independently. If one person is drowning out the others, ask them to lower their microphone level in the device settings or during connection.
Echo is most often caused by speakers, an open Twitch player, or a guest monitoring their own microphone. Before going live, it's useful to have participants say a few phrases one by one and check whether the voice comes back. If there's a problem, first turn off the speakers and extra tabs rather than adding filters on top of a duplicate signal.
Which Scenes to Prepare for a Collaborative Stream
Create a separate scene for the conversation and a backup scene with just the host. The backup scene shouldn't contain the Guest Star Browser Source. It lets you hide a frozen image, an accidentally connected person, or technical actions in the Twitch panel with a single switch.
For different formats, you can make several scenes with the same source: full-screen conversation, a reaction with gameplay, an interview with styling. Don't create independent copies of the Browser Source for each scene unless necessary. Multiple pages are harder to update, and it's easy to miss an old link in one of the scenes.
A shared source has a limitation: a new Guest Star layout immediately affects every scene where it's used. If one scene needs a grid and another needs a close-up, change the composition in Guest Star before switching on air.
How to Hide a Guest or Remove Them from the Stream
To remove a single participant, use the controls in Guest Star: move them to the waiting area, remove them from the active room, or change the layout lineup. They'll stop appearing in the combined output, and the other participants will stay on screen.
If you need to hide everyone at once, switch OBS to the backup scene without the Browser Source. This is faster than hunting for a button in the panel if a participant connected by accident, is breaking the rules, or has inappropriate content on camera.
The backup scene hides all guests, including those who are fine. For a normal participant change, it's better to manage the room through Guest Star. Use the emergency scene when it's more important to immediately pull the combined output off the air.
Why OBS Shows a Blank or Black Screen Instead of Guests
Open the Browser Source properties and compare the URL with the current output link from the active Guest Star session. A common mistake is pasting the guest invitation into OBS or keeping the address of an ended room. After replacing the link, save the settings and wait for it to load.
Then check the layer order. Guest Star may be behind the background, hidden in the sources list, inside a disabled group, or cropped. Temporarily bring it above the other elements and stretch it across the whole canvas. If the image appears, the problem is in the scene styling.
Also check the host's internet connection, CPU load, and RAM usage. The Browser Source depends on OBS resources and the network. Closing extra tabs and programs can help, but it won't fix an unstable connection on the guest's end.
Why a Guest's Camera or Microphone Isn't Working
If a participant has a black screen, first check the browser's camera permission. Then make sure the right device is selected in the room, not a virtual camera with no image or a laptop's built-in camera instead of an external one.
The camera may be taken by a calling app, another browser tab, screen recording, or a manufacturer's utility. The guest needs to close extra applications, refresh the room page, and select the device again. After rejoining, it's worth going through the camera and microphone check again.
If the camera works on the guest's end but doesn't reach the room, the cause may be privacy extensions, script blocking, or browser restrictions. The host can't change permissions on someone else's device, so it's best to test the connection before going live.
What to Check Before a Collaborative Broadcast
- The current Guest Star session is created and the participant has received an invitation to join the room.
- OBS has the Browser Output link pasted, not the guest invitation.
- The Browser Source width and height match the scene canvas size.
- The source is placed above the background and is visible in the right scene.
- Guest Star audio responds in the OBS audio mixer and isn't duplicated through another capture.
- Guests are using headphones and aren't listening to the stream through the Twitch player.
- A backup scene without guests is prepared, and there's a way to reach participants outside Twitch.
- A short local recording has been made to check the image, volume, and synchronization.
Last Articles
What has changed in design and functionality We have updated the website to make working with it faster and more convenient. The main changes affect ..
Good afternoon, I've collected all the news during this time.: 1. The main news is that prices for twitch viewers have been greatly reduced, while Tw..
1. Use promo code "December2025" for a 15% discount for all our viewers2. We have reduced the base prices for our configurator and the most affordable..
Twitch services are working stably, so we are ready to cooperate with squads, resellers, service owners, bot owners, and many others.Individual te..
We have completely updated our Twitch viewer services, and they are now working stably. We only use high-quality IP addresses for the viewers.The ..
Hello everyone! Today, we are announcing a new feature—"Twitch Viewer Configurator". Now, you can customize any plan for your Twitch channel. Choo..
Greetings, I have compiled a guide for streamers, which will be very relevant at the moment. Now YouTube and twitch have disabled monetization from vi..
We have finally developed the APINow it will be more convenient for our partner sites to work with us.To update the maximum tariffs for YouTube, an up..
Due to the huge popularity of the partnership services and referral program, we have made a cooperation table. The essence is very simple: more live a..
Our Services for Streamers







Our Services for Content Creators